Block Storage API and scheduler services typically run on the controller nodes.
controller node.
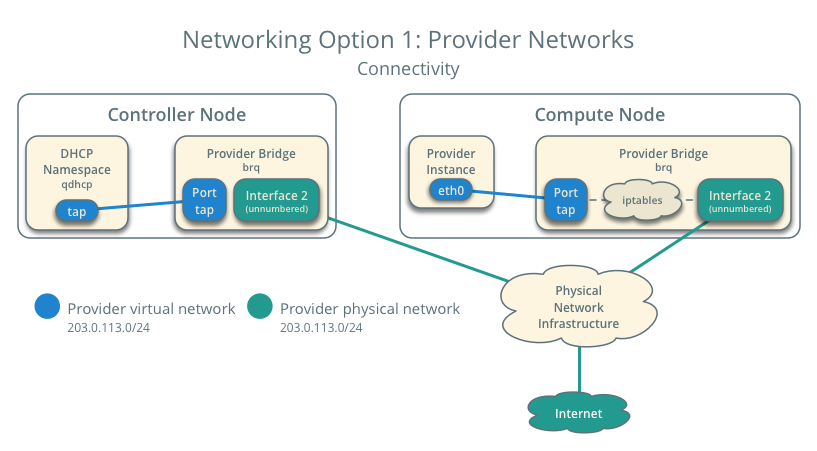
Networking option 1
includes one provider (external) network with one instance that uses it.
provider (external) network that connects to the physical network infrastructure via
layer-2 (bridging/switching). This network includes a DHCP server that provides IP addresses to instances.

controller node
$ . admin-openrc
$ openstack network create --share --external --provider-physical-network provider --provider-network-type flat provider

--share : use the virtual network
--external : virtual network should be external (--internel)
connect the flat virtual network to the flat (native/untagged) physical network on the eth1 interface
on the host using information from the following files:
ml2_conf.ini :
[ml2_type_flat]
flat_networks = provider
linuxbridge_agent.ini :
[linux_bridge]
physical_interface_mappings = provider:eth1
Create a subnet on the network:
openstack subnet create --network provider --allocation-pool start=START_IP_ADDRESS,end=END_IP_ADDRESS --dns-nameserver DNS_RESOLVER --gateway PROVIDER_NETWORK_GATEWAY --subnet-range PROVIDER_NETWORK_CIDR provider
Replace START_IP_ADDRESS and END_IP_ADDRESS with the first and last IP address of the range within
the subnet that you want to allocate for instances.
you can use one from the
/etc/resolv.conf file on the host.
Example
The provider network uses 203.0.113.0/24 with a gateway on 203.0.113.1. A DHCP server assigns each instance an IP address from 203.0.113.101 to 203.0.113.250. All instances use 8.8.4.4 as a DNS resolver.
$ openstack subnet create --network provider --allocation-pool start=203.0.113.101,end=203.0.113.250 --dns-nameserver 8.8.4.4 --gateway 203.0.113.1 --subnet-range 203.0.113.0/24 provider

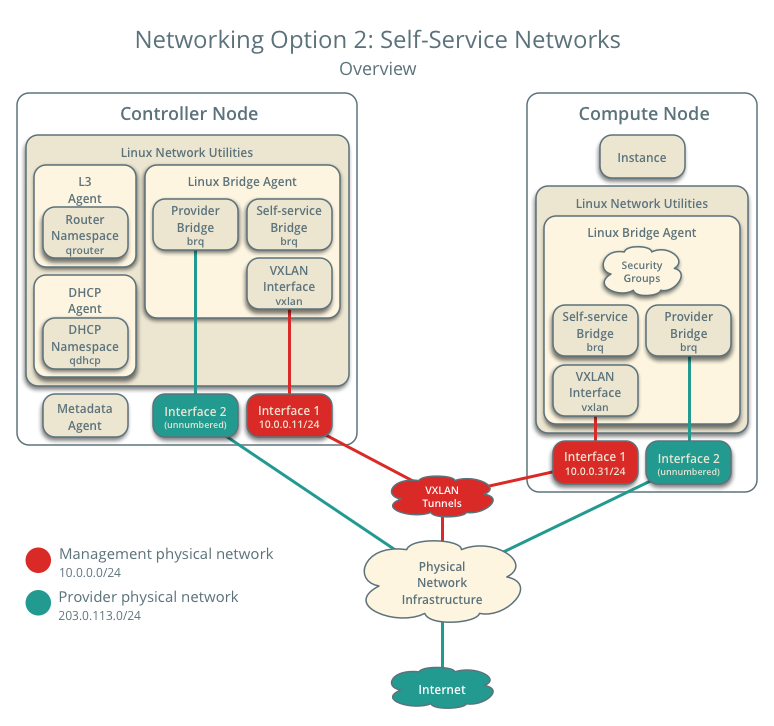
Self-service network
Networking option 2
includes one provider network with one instance that uses it and one self-service (private) network with one instance that uses it
controller node
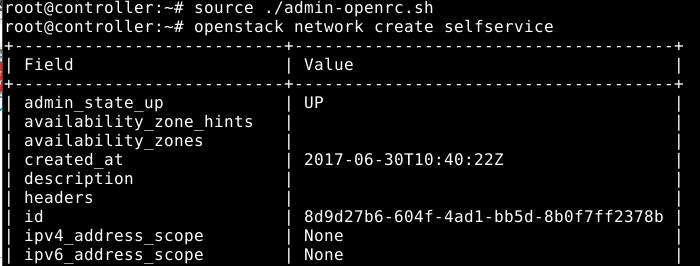
source demo-openrc
$ openstack network create selfservice
note: if make error like http please restart machin. Demo user may be error admin user can work without error. Other is nova.conf must be well configured check it
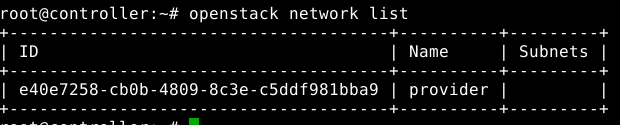
openstack network list

ml2_conf.ini :
[ml2]
tenant_network_types = vxlan
[ml2_type_vxlan]
vni_ranges = 1:1000
3. Create a subnet on the network:
$ openstack subnet create --network selfservice --dns-nameserver DNS_RESOLVER --gateway SELFSERVICE_NETWORK_GATEWAY --subnet-range SELFSERVICE_NETWORK_CIDR selfservice
Replace DNS_RESOLVER with the IP address of a DNS resolver. In most cases, you can use one from the /etc/resolv.conf file on the host.
Replace SELFSERVICE_NETWORK_CIDR with the subnet you want to use on the self-service network. You can use any arbitrary value, although we recommend a network from RFC 1918.
Example
The self-service network uses 172.16.1.0/24 with a gateway on 172.16.1.1. A DHCP server assigns each instance an IP address from 172.16.1.2 to 172.16.1.254. All instances use 8.8.4.4 as a DNS resolver.
openstack subnet create --network selfservice --dns-nameserver 8.8.4.4 --gateway 172.16.1.1 --subnet-range 172.16.1.0/24 selfservice

openstack subnet list

Create a router
Self-service networks connect to provider networks using a virtual router that typically performs bidirectional NAT. Each router contains an interface on at least one self-service network and a gateway on a provider network. The provider network must include the router:external option to enable self-service routers to use it for connectivity to external networks such as the Internet. The admin or other privileged user must include this option during network creation or add it later. In this case, the router:external option was set by using the --external parameter when creating the provider network.
controller node,
$ . admin-openrc
$ . demo-openrc
$ openstack router create router

4. Add the self-service network subnet as an interface on the router:
$ neutron router-interface-add router selfservice
# service nova-api restart
# service nova-consoleauth restart
# service nova-scheduler restart
# service nova-conductor restart
# service nova-novncproxy restart
5. Set a gateway on the provider network on the router:
$ neutron router-gateway-set router provider
Verify operation
On the controller node
$ . admin-openrc
$ ip netns
3. List ports on the router to determine the gateway IP address on the provider network:
$ neutron router-port-list router

4. Ping this IP address from the controller node or any host on the physical provider network:
$ ping -c 4 203.0.113.102
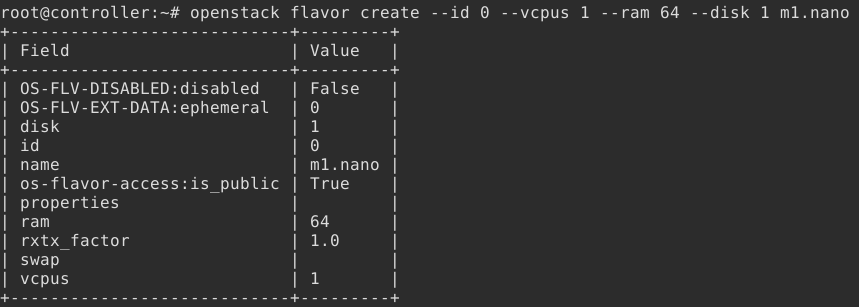
Create m1.nano flavor
Only use this flavor with the CirrOS image for testing purposes.
$ openstack flavor create --id 0 --vcpus 1 --ram 64 --disk 1 m1.nano
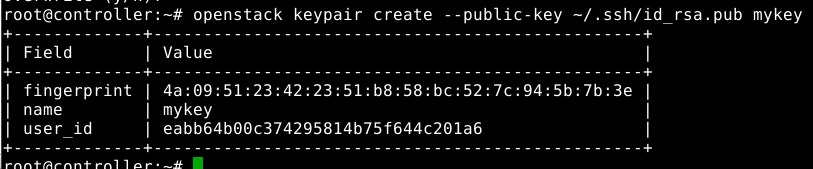
Generate a key pair
Before launching an instance, you must add a public key to the Compute service.
demo project credentials:
$ . demo-openrc
2. Generate a key pair and add a public key:
$ ssh-keygen -q -N ""
$ openstack keypair create --public-key ~/.ssh/id_rsa.pub mykey
$ openstack keypair list

Add security group rules
default security group applies to all instances and includes firewall rules that deny remote
access to instances.
$ openstack security group rule create --proto icmp default
– Permit secure shell (SSH) access:
$ openstack security group rule create --proto tcp --dst-port 22 default
Launch an instance
Determine instance options
To launch an instance, you must at least specify the flavor, image name, network, security group, key, and instance name.
controller node,
$ . demo-openrc
A flavor specifies a virtual resource allocation profile which includes processor, memory, and storage.
$ openstack flavor list

$ openstack image list

$ openstack network list

$ openstack security group list

openstack security group rule list default

Launch the instance:
Replace PROVIDER_NET_ID with the ID of the provider provider network.
$ openstack server create --flavor m1.nano --image cirros --nic net-id=PROVIDER_NET_ID --security-group default --key-name mykey provider-instance
$ openstack server create --flavor m1.nano --image cirros --nic net-id=e40e7258-cb0b-4809-8c3e-c5ddf981bba9 --security-group default --key-name mykey provider-instance
$ openstack server list
Access the instance using the virtual console
. Obtain a Virtual Network Computing (VNC) session URL for your instance and access it from a web
browser:
$ openstack console url show provider-instance
$ ping -c 4 203.0.113.1
3. Verify access to the internet:
$ ssh cirros@203.0.113.103
Replace SELFSERVICE_NET_ID with the ID of the selfservice network.
$ openstack server create --flavor m1.nano --image cirros --nic net-id=SELFSERVICE_NET_ID --security-group default --key-name mykey selfservice-instance
Access the instance using a virtual console
$ openstack console url show selfservice-instance
2. Verify access to the self-service network gateway:
$ ping -c 4 172.16.1.1
3. Verify access to the internet:
$ ping -c 4 openstack.org
1. Create a floating IP address on the provider virtual network:
$ openstack floating ip create provider
2. Associate the floating IP address with the instance:
$ openstack server add floating ip selfservice-instance 203.0.113.104
3. Check the status of your floating IP address:
$ openstack server list
Verify connectivity to the instance via floating IP address from the controller node or any host on the
provider physical network:
$ ping -c 4 203.0.113.104
Access your instance using SSH from the controller node or any host on the provider physical network:
$ ssh cirros@203.0.113.104
No comments:
Post a Comment