Identity (keystone)
List all users
$ openstack user list
List Identity service catalog
$ openstack catalog list
Images (glance)
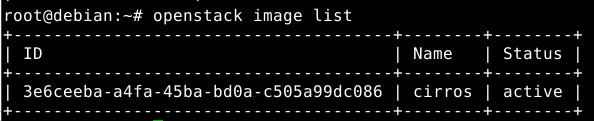
List images you can access
$ openstack image list
Delete specified image
$ openstack image delete IMAGE
Describe a specific image
$ openstack image show IMAGE
Update image
$ openstack image set IMAGE
Upload kernel image
$ openstack image create "cirros-threepart-kernel" \
--disk-format aki --container-format aki --public \
--file ~/images/cirros-0.3.5-x86_64-kernel
Upload RAM image
$ openstack image create "cirros-threepart-ramdisk" \
--disk-format ari --container-format ari --public \
--file ~/images/cirros-0.3.5-x86_64-initramfs
Upload three-part image
$ openstack image create "cirros-threepart" --disk-format ami \
--container-format ami --public \
--property kernel_id=$KID-property ramdisk_id=$RID \
--file ~/images/cirros-0.3.5-x86_64-rootfs.img
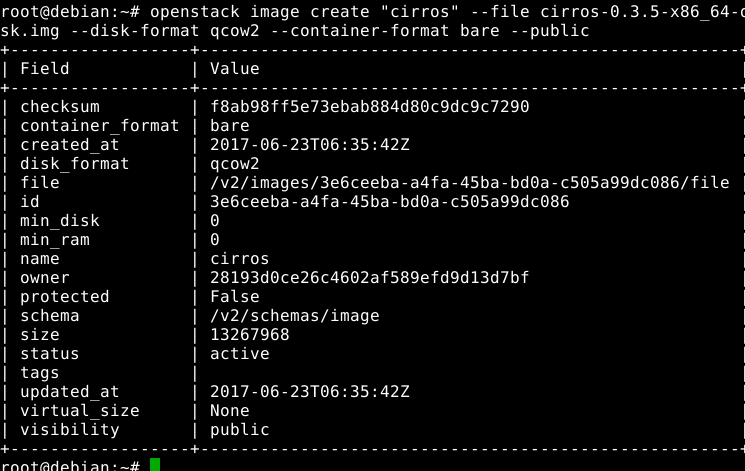
Register raw image
$ openstack image create "cirros-raw" --disk-format raw \
--container-format bare --public \
--file ~/images/cirros-0.3.5-x86_64-disk.img
Compute (nova)
List instances, check status of instance
$ openstack server list
List images
$ openstack image list
Create a flavor named m1.tiny
$ openstack flavor create --ram 512 --disk 1 --vcpus 1 m1.tiny
List flavors
$ openstack flavor list
Boot an instance using flavor and image names (if names are unique)
$ openstack server create --image IMAGE --flavor FLAVOR INSTANCE_NAME
$ openstack server create --image cirros-0.3.5-x86_64-uec --flavor m1.tiny \
MyFirstInstance
Log in to the instance (from Linux)
Note
The ip command is available only on Linux. Using ip netns provides your environment a copy of the network stack with its own routes, firewall rules, and network devices for better troubleshooting.
# ip netns
# ip netns exec NETNS_NAME ssh USER@SERVER
# ip netns exec qdhcp-6021a3b4-8587-4f9c-8064-0103885dfba2 \
ssh cirros@10.0.0.2
Note
In CirrOS, the password for user cirros is cubswin:). For any other operating system, use SSH keys.
Log in to the instance with a public IP address (from Mac)
$ ssh cloud-user@128.107.37.150
Show details of instance
$ openstack server show NAME
$ openstack server show MyFirstInstance
View console log of instance
$ openstack console log show MyFirstInstance
Set metadata on an instance
$ nova meta volumeTwoImage set newmeta='my meta data'
Create an instance snapshot
$ openstack image create volumeTwoImage snapshotOfVolumeImage
$ openstack image show snapshotOfVolumeImage
Pause, suspend, stop, rescue, resize, rebuild, reboot an instance
Pause
$ openstack server pause NAME
$ openstack server pause volumeTwoImage
Unpause
$ openstack server unpause NAME
Suspend
$ openstack server suspend NAME
Unsuspend
$ openstack server resume NAME
Stop
$ openstack server stop NAME
Start
$ openstack server start NAME
Rescue
$ openstack server rescue NAME
$ openstack server rescue NAME --rescue_image_ref RESCUE_IMAGE
Resize
$ openstack server resize NAME FLAVOR
$ openstack server resize my-pem-server m1.small
$ openstack server resize --confirm my-pem-server1
Rebuild
$ openstack server rebuild NAME IMAGE
$ openstack server rebuild newtinny cirros-qcow2
Reboot
$ openstack server reboot NAME
$ openstack server reboot newtinny
Inject user data and files into an instance
$ openstack server create --user-data FILE INSTANCE
$ openstack server create --user-data userdata.txt --image cirros-qcow2 \
--flavor m1.tiny MyUserdataInstance2
To validate that the file was injected, use ssh to connect to the instance, and look in /var/lib/cloud for the file.
Inject a keypair into an instance and access the instance with that keypair
Create keypair
$ openstack keypair create test > test.pem
$ chmod 600 test.pem
Start an instance (boot)
$ openstack server create --image cirros-0.3.5-x86_64 --flavor m1.small \
--key-name test MyFirstServer
Use ssh to connect to the instance
# ip netns exec qdhcp-98f09f1e-64c4-4301-a897-5067ee6d544f \
ssh -i test.pem cirros@10.0.0.4
Manage security groups
Add rules to default security group allowing ping and SSH between instances in the default security group
$ openstack security group rule create default \
--remote-group default --protocol icmp
$ openstack security group rule create default \
--remote-group default --dst-port 22
Networking (neutron)
Create network
$ openstack network create NETWORK_NAME
Create a subnet
$ openstack subnet create --subnet-pool SUBNET --network NETWORK SUBNET_NAME
$ openstack subnet create --subnet-pool 10.0.0.0/29 --network net1 subnet1
Block Storage (cinder)
Used to manage volumes and volume snapshots that attach to instances.
Create a new volume
$ openstack volume create --size SIZE_IN_GB NAME
$ openstack volume create --size 1 MyFirstVolume
Boot an instance and attach to volume
$ openstack server create --image cirros-qcow2 --flavor m1.tiny MyVolumeInstance
List all volumes, noticing the volume status
$ openstack volume list
Attach a volume to an instance after the instance is active, and the volume is available
$ openstack server add volume INSTANCE_ID VOLUME_ID
$ openstack server add volume MyVolumeInstance 573e024d-5235-49ce-8332-be1576d323f8
Note
On the Xen Hypervisor it is possible to provide a specific device name instead of automatic allocation. For example:
$ openstack server add volume --device /dev/vdb MyVolumeInstance 573e024d..1576d323f8
This is not currently possible when using non-Xen hypervisors with OpenStack.
Manage volumes after login into the instance
List storage devices
# fdisk -l
Make filesystem on volume
# mkfs.ext3 /dev/vdb
Create a mountpoint
# mkdir /myspace
Mount the volume at the mountpoint
# mount /dev/vdb /myspace
Create a file on the volume
# touch /myspace/helloworld.txt
# ls /myspace
Unmount the volume
# umount /myspace
Object Storage (swift)
Display information for the account, container, or object
$ swift stat
$ swift stat ACCOUNT
$ swift stat CONTAINER
$ swift stat OBJECT
List containers
$ swift list
 mysql database
 add the admin role to the glance